Showing posts with label Natural Dyeing. Show all posts

Saturday, November 1, 2014

Natural Dyes and Linen

 Would you believe that my family is planning on moving again? It would be my 5th move since I started this blog in 2008. If I'm lucky the future will hold a "craft room" for me...fingers crossed. I've been thinning out my possessions in preparation for moving.  I had little bottles of dye-stuff from Maiwa, the natural dye store in Vancouver BC. I figured a good use for these little bits would be to experiment dyeing something other than wool. I went with my second favorite textile---linen.

I cut little squares and began experimenting. Dying fabric and cellulose fiber is new to me. It was so much fun  using these little squares because there was no harm done if I screwed it up. It's not as risky as dying a yarn that took 2 weeks to spin, right?

Normally I don't like cutch but on fabric it looked nice. I added iron to cutch and got a totally cool dark taupe.  Marigold made a nice orange-yellow. I added tartaric acid to marigold and got a pale yellow.

I tried black tea and got a dull color. I used marigolds and back tea and it looked a little more interesting.


 The logwood experiment was interesting. When I added tartaric acid I got an orange instead of the standard purple that usually comes from logwood.


The house that we are trying to buy was built in 1912. I've looked at paint swatches of color palettes from that time period. Of course they only had natural pigments back then. Inspired by the old-timey colors and the linen swatches I was dying, I decided to make a color palette: cutch, marigold, cutch with iron, logwood with tartaric acid, and marigold with black tea! I showed the palette to my Hubby and he was not impressed. That's okay.  I'll just keep day-dreaming of remodeling my future home.


Monday, October 27, 2014

Shelf Mushroom Dye for Autumn

While I was out on a hike in the Snoqualmie National Forest last week I found this clump of shelf mushrooms.  Unfortunately I'm not very talented at identifying mushrooms so I can't tell you which kind it is.  I did know it would make a good dye because it was very similar to the one I had used before.  It's was dark reddish-brown on all parts.
 I popped off a few pieces and took them home. I chopped them up on a cutting board and simmered them for about an hour. I added ammonia and some tin as a mordant. After straining off the dye and tossing out the mushroom pieces, I added some roving to the dye-bath and simmered it for a half hour or so. I let the wool sit in the dye-bath overnight to cool.
 In the morning I rinsed it out.  It smelled pretty bad so I soaked it in my favorite wool wash-- "Soak" in the scent called "Celebration". Yum.

I spun it up as a 3-ply worsted yarn. It's a perfect Autumn color.

Monday, November 4, 2013

One Mushroom, Many Colors!

 Yesterday I attended a class offered by the Puget Sound Mycological Society to learn more about mushroom identification. The whole class was fascinating and now have a better understanding of the processes one must go through to identify a mushroom. The participants brought in various mushrooms to ID. I spotted a grand Phaeolus schweinitzii - a "Dyer's Polypore"! I asked the student who brought it in if I could take it home at the end of class and she agreed. (Thank you!)
 Upon returning home I promptly got out my large dyeing pot, chopped the mushroom, covered it with water and set it to simmer for about a half hour. I wish I would have weighed it. I'm guessing it was about 5 lbs. I added some ammonia and used a tin mordant and got the very orange skein dyed in about 1/2 an hour. I had so much dye material left I grabbed by little sample skeins and began adjusting the pH and the mordants. The skeins that turned out yellow had either no mordant (other than the residual tin floating around) or a pre-mordant with alum. Then I threw in some iron and my samples started coming out green! Some skeins I dipped in for 2 minutes to get a lighter color and some I left in for 1/2 an hour.  It's amazing how many colors you can get from one mushroom!

Sunday, October 20, 2013

Mixed Mordant Experiment

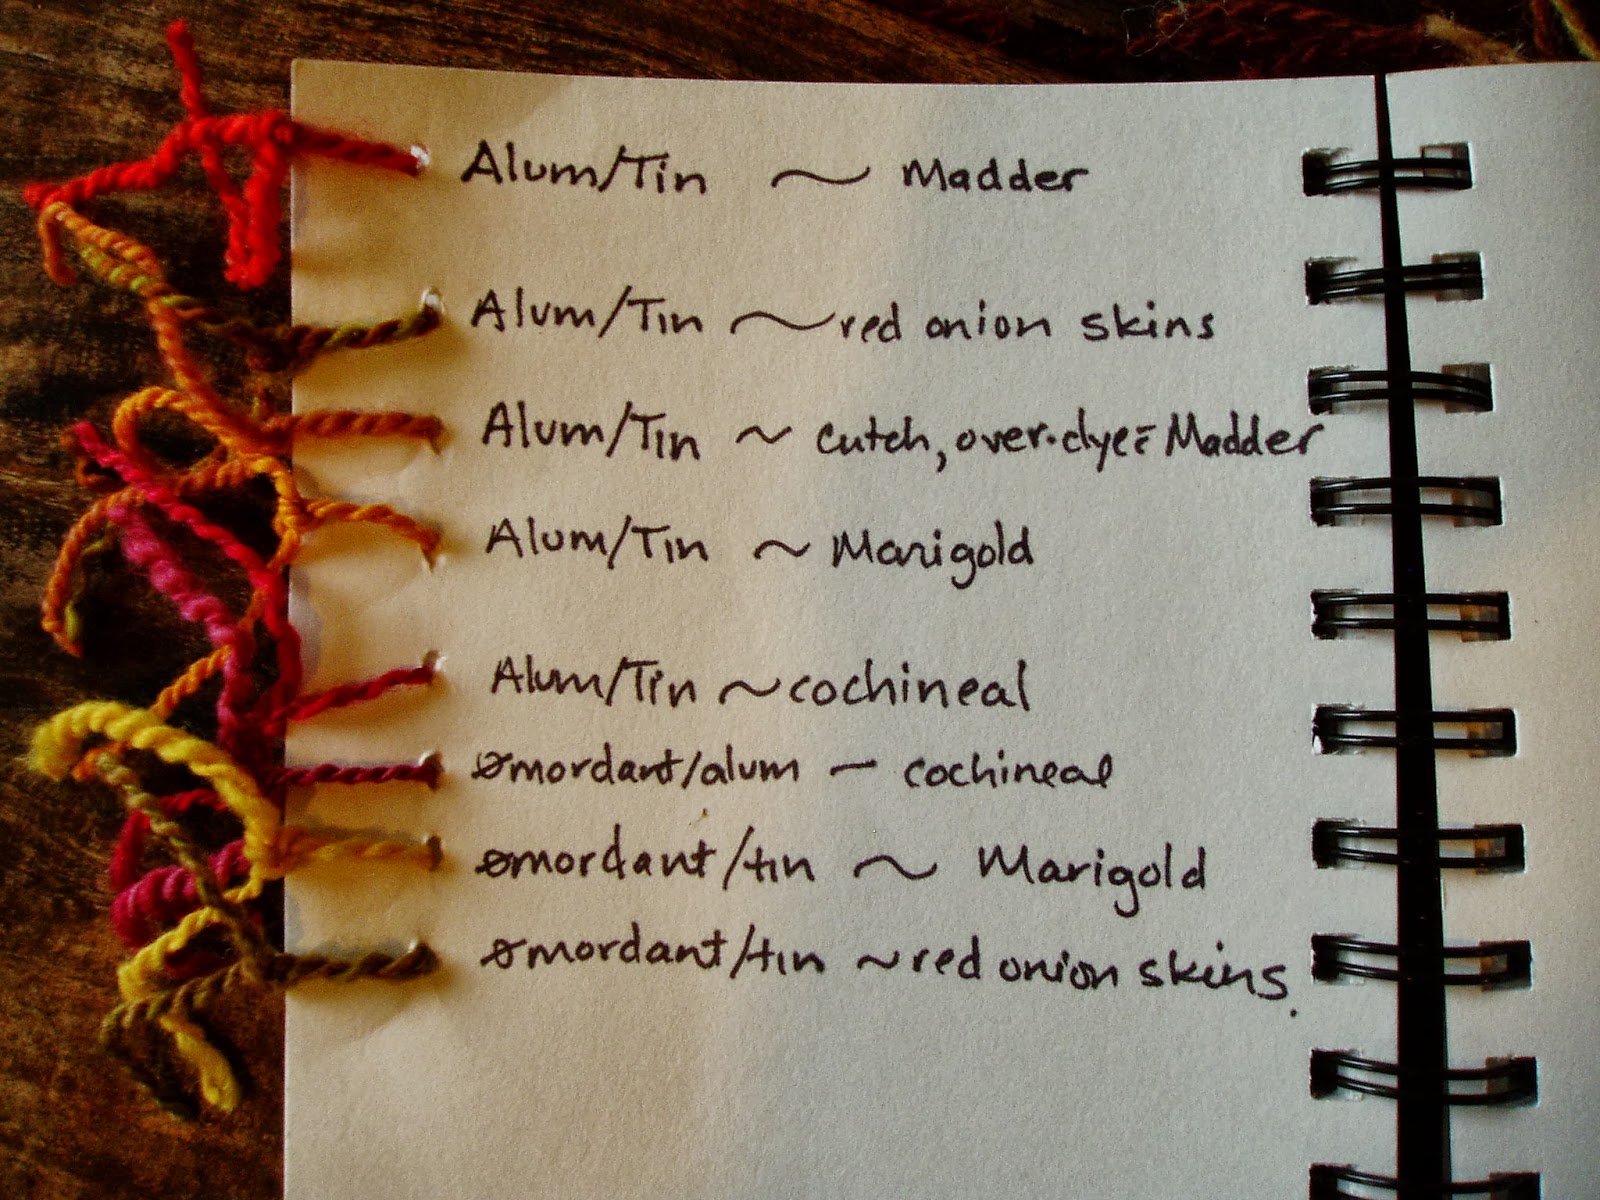
 Mordants are substances that dyers use to adhere dyes to fibers. Typically dyers use alum, copper, tin, tannic acid, or iron, among others. Each of the mordants will have a different effect on the color. A mordant can brighten, dull, or change a color all together. You can add the mordant to the fiber before, during, or after the dyeing process. My mixed mordant experiment goes like this: I would pre-mordant roving, then spin it into singles, then ply together singles that had different mordants. My prediction: if I dip a multi-mordant strand into the dye it should come out with two colors, giving it a barber-pole effect.  


I started by taking 4oz of Blue Face Leicester roving, carefully handling it so it wouldn't felt and soaking it in water for 30 minutes.
After I dissolved a teaspoon of tin in some water I let it cool completely. I added the wool and slowly heated the mordant bath until it was simmering.  I let it simmer for half an hour and then let it all cool to room temperature. I carefully rinsed the roving. Essentially there was no sudden change in temperature or agitation of the wool to prevent felting.
Next I did the same procedure with an alum mordant. After all the roving was dry I spun singles then plied the different mordant strands together.
The results were mixed. Some of the color variations were too subtle to notices.  Others had the barber-pole effect that I was looking for. The yarn that I'm holding above was made with a tin/alum combination yarn dyed with red onion skins.  
This yellow yarn was made with one strand of alum and one strand with no mordant plied together than dyed with marigold flowers heads.
This pink yarn was make with one strand of alum and one strand with no mordant plied together than dyed with cochineal.
In general I don't enjoy keeping records, but I did take notes this time.  One thing that I learned during this experiment is that I really like what tin does to the natural dyes. The brightest colors came from the tin.
 As soon as the little skeins were dry, I rolled them into balls and started a knitting project.

Friday, October 18, 2013

Mushroom Dye Class

 The mushroom dye class put on by the Puget Sound Mycological Society was lots of fun. Our teacher was Alissa Allen and you can see her website here: Mycopigments.com  We tore up a bunch of mushrooms and put them in a pot. Alissa told us about checking the ph to bring out the colors.
 There was a display of mushroom and lichen dyed fibers and garments.
We each dyed 2 silk scarfs. This all took us only 2 hours and I was happy to leave prepared to go out on my own and try dyeing with mushrooms. I very much appreciated the handout Alissa gave us that will help my identify the most common mushrooms for dyeing.  I'm going to try to get out this weekend for a hike and see if I can find some.

Saturday, October 5, 2013

Madder-Dyed Scarf


 Once the loom was warped the weaving went really fast---done in one afternoon.  It had been a while since I had used the loom so I had forgotten how long it takes to warp and how fast the weaving part goes. My little madder-dyed scarf was made by using 3 types of handspun yarns in the warp.  They were all dyed with madder and alum. Then I used the yarn that was dyed with madder and "saddened" with iron for the weave.

Thursday, October 3, 2013

Dyeing with Madder


From left to right:
1. handspun wool that was once dyed with cutch then over-dyed with madder with an alum mordant
2. hand carded, hand spun blended alpaca that I spun last month, dyed madder/alum
3. Norwegian White hand spun dyed with madder/alum
4. Norwegian White hand spun dyed with madder/iron

I've been dyeing.
These are the yarns that I'm using for a little weaving project. I'm warping the loom now.


Monday, July 16, 2012

Cochineal, Logwood, and Tin

 The craze of natural dyeing continues.  I started with a skein made out of flick-carded Romney locks that I spun into a lace weight 2-ply.  I dyed it with cochineal but there was a problem.  The dye didn't take up where I had the ties in the skein.  Also, there was a few dark gray spots on the yarn from me not cleaning the pot well.  To fix the situation I dipped half of the skein in a tin mordant and heated it.  (I had to tie up half the skein so it didn't fall in the dye bath.) Then I added some left over logwood dye liquid to the tin water.  After a little time in the heat, the yarn turned bright purple magenta.
Now I have to decide what to make with it.

Wednesday, July 11, 2012

Dyeing with Logwood

Last weekend I ventured into a dyeing project. Here's a photo of my adventure. The first dye was with Logwood which I soaked and heated for a half hour and then poured the liquid off.  The darkest purple yarn was achieved with a tin mordant and the first pass through the Logwood dye bath.   Next I took some locks and poured some of the dye bath over them and added a little heat for a short while.  Then I added the roving to the rest of Logwood dye bath.  I didn't mordant the roving, but I assume a little tin residue was probably in the dye bath by that time.  (Or does the mordant always stay on the wool that was previously in the dye bath?) The roving was heating and then it sat over night before I rinsed it out.  The fourth dyeing project was with cochineal.  I used only a heaping tablespoon of the dried bugs, ground them in a coffee grinder (the one that's for dying only), and didn't use a mordant.  The skein was submerged, heated, and left overnight. The result was a nice rosy-pink color.  As you can tell my my description of my dyeing project, I am not a precise dyer.  I don't keep records, I don't measure much, and I don't expect to impress other natural dyers by my techniques.  However, I do enjoy throwing wool in a pot and seeing what happens. If I don't like it, there's always over-dyeing.  ;)

Monday, January 9, 2012

Lichen Dyeing

 I wanted to take the Lichen Dyeing class at Madrona, but I didn't get in. The class filled up in less that 45 minutes and I couldn't sit in front of the computer at work!  Ugh.  Well, who needs a fancy-schmancy class anyway?  I've decided to teach myself how to dye with Lichen.  My co-worker and friend, Marge, picked some Lichen for me last weekend when she was out by Cashmere, Washington.
 I use just water and heat for the first go-around.  The yarn was golden yellow within a half hour of being in the pot!  I threw in a little alum with the somewhat depleted dye bath and got the softer yellow after an hour.

Sunday, October 9, 2011

Stinky Finian

Who's Finian and why does he stink?  Finian is that little Shetland in the photo.  I bought his fleece last summer.  I washed it with really hot water and Dawn using the top loader method.  Then I dyed little batched of the fleece on the stove with various dye stuff.  And guess what! You can still smell his stink.  I don't know why.

The yarn samples above are from Finian's fleece dyed with marigold with alum as a mordant.  I ran the locks through my drum carder just once.  The staple length is so long that it barely worked to card it that way.  I was trying to decide between a 2 ply and a 3 ply yarn.  I'm going with the 3 ply and plan spin a whole skein now.

Saturday, October 8, 2011

Natural Dyeing - this time with iron

For the next batch of natural dyeing I used iron as a mordant.  I'm pretty sure that I used too much because the wool feels somewhat sticky.  The purple-blue grays were achieved with logwood and the light khaki green is from marigolds.  The wool is Shetland.

Monday, August 23, 2010

Shallot Skin Dye

The other day I was in the Asian Grocery and I saw a giant bin of shallots. The outer papery skins had all fallen off. I scooped up handfuls of the skins and put them in a bag and paid for them by the pound. I have no idea how much they cost--I wasn't paying attention because I was buying other produce. I told the lady at the check-out that I was going to try to make a dye out of the shallot skins. She told be that in China they made a dye out of onion skins to color eggs that were then given to women to eat when they were post partum. Interesting!

At home I poured hot water over the skins and let them soak for over a week (because I got busy). Then I added some Alum and a sample skein to the dye and left it in the sun for another week or so.
Here is the color I obtained. I'd never heard of anyone using shallot skins for dye. I'm pleased with the outcome of this experiment.
This is the second weaving project for my class. The yarn is silk/seacell and again I used mostly a plain weave.

Tuesday, September 16, 2008

Over-Dyeing


Over-dyeing the Cotswold worked well. I added more madder root to the dye bath and it really darkened up the skeins. I used low heat for about 2 hours then kept the yarn in over night. By morning I had the color I wanted in the first place: a nice autumn orange. Technically it's not autumn yet but now I can start knitting my next project as the weather cools down.

Friday, September 12, 2008

Nature is Unpredictable

What color should we call this? Post a comment to vote: a)pumpkin-peach hybrid, b) cantaloupe pie, c) creamsicle vomit, or d) just make up your own. Be honest now.

Thursday, September 11, 2008

Madder


After I scoured the Cotswold I put it in a tin mordant bath. That was two days ago. This whole thing is going really slow. I use my kitchen for dyeing. (I know, I know...but I have no other water and sink source.) So this little project has been smellin' up the place for a while. I wanted to do a pumpkin, fall inspired color. I had some madder around for dye stuff and I have never tried it. I used a tin mordant so I'll be more likely to get orange. I soaked the madder root over night. Then I added the fleece to the dye bath. I'm not happy with how light it turned out. Of course I know why----not enough dye stuff. I'm going to give it a little longer on some low heat and see if it darkens up. I'll probably end up over-dyeing it because I don't like pastel color at all.

Sunday, August 24, 2008

Black Eyed Susan, Part 2


Since I picked so many Black Eyed Susan flowers I decided to try making a dye using DECOMPOSITION. I filled a large jar with the flower heads, added water, and let it sit out for about 3 weeks. I did not stir it everyday. In fact, I found white mold growing. Last night I finally strained out most of the plant material and heated the remaining liquid to make the dye bath. I used a tin mordant on some hand spun wool. The dye bath was a murky brown and after 30 minutes I found a nice light yellow. I left one skein in the dye bath over night and in the morning I found it was the exact same color as the one that was left in for only 30 minutes. The last photo shows the comparison of the colors achieved with heat verses decomposition of the Black Eyed Susan.